The Best Fluffy Pancakes recipe you will fall in love with. Full of tips and tricks to help you make the best pancakes.


There are few things in life as comforting as the smell of warm peanut butter cookies baking. That rich, nutty aroma immediately brings a smile to my face! For years, I thought making them meant preheating the oven and waiting, but I’ve discovered a secret weapon that has changed my cookie game forever: the air fryer. I was skeptical at first, but believe me when I say these are some of the best peanut butter cookies I have ever made.
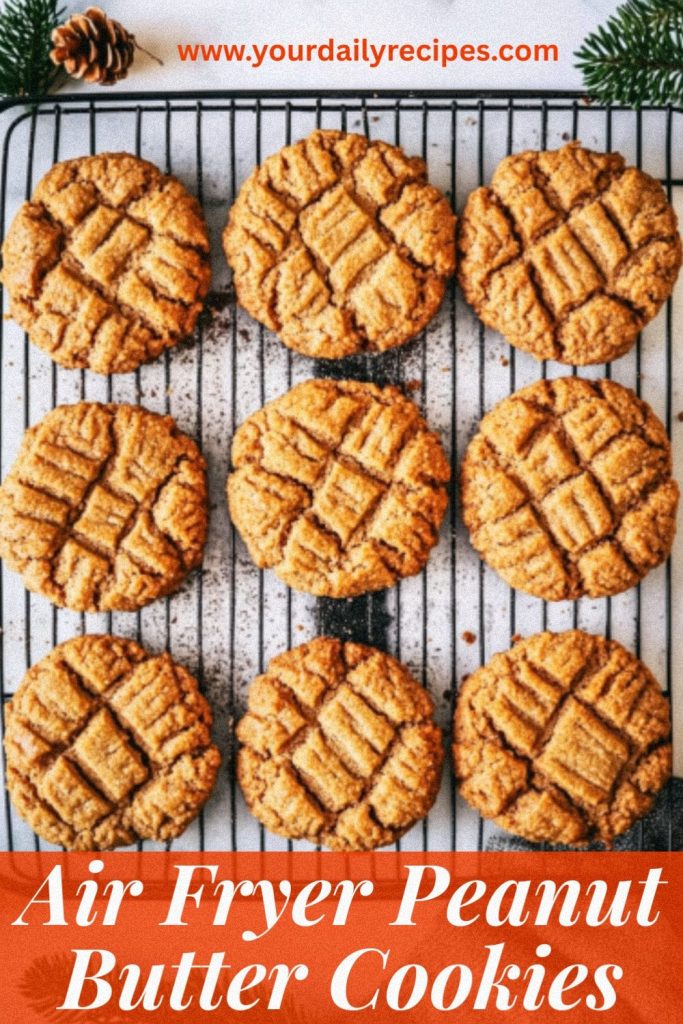
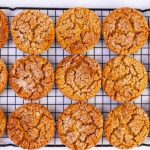
Imagine a cookie with beautifully crisp, golden-brown edges that give way to an incredibly soft, tender, and chewy center. The flavor is pure, classic comfort—that perfect balance of sweet and salty peanut butter goodness in every single bite. They have that signature criss-cross pattern on top that just screams “homemade with love.”
This recipe isn’t just about incredible taste; it’s about making life easier. Using the air fryer means you can go from a sudden cookie craving to biting into a warm, delicious treat in less than 15 minutes. It’s perfect for a quick after-school snack, a simple dessert for two, or whenever you just need a little something sweet without the fuss. In this post, I’ll walk you through every simple step to achieve cookie perfection.
General Information
| Particulars | Details |
|---|---|
| Preparation Time | 10 min. |
| Cook Time | 7 min. |
| Total Time | 17 min. |
| Yields | 12 cookies |
| Difficulty | Easy |
| Total Calories | 135 kcal (Per Serving) |
| Cuisine | American |
Why Make Peanut Butter Cookies in an Air Fryer?
You might be wondering if it’s really worth making cookies in an air fryer instead of a traditional oven. My answer is a resounding YES! The air fryer is a game-changer for baking, especially for small batches. It’s my go-to method, and here’s why you’ll fall in love with it too:
- Lightning Fast: Forget waiting for the oven to preheat! The air fryer heats up in a couple of minutes, and the cookies themselves cook in about 5-7 minutes. It’s the fastest way to get your cookie fix.
- The Perfect Texture: The circulating hot air creates a cookie that is truly the best of both worlds. You get delightfully crispy edges that provide a satisfying crunch, while the inside stays wonderfully soft, moist, and chewy.
- Ideal for Small Batches: This recipe is perfect for when you only want a handful of cookies. You can bake just four or five at a time, satisfying your craving without being tempted by a full dozen sitting on the counter.
- Energy Efficient & Cool Kitchen: Why heat your entire house for a few cookies? The air fryer uses significantly less energy than a conventional oven and won’t turn your kitchen into a sauna, making it perfect for year-round baking.
- Incredibly Simple: With minimal prep and a super quick cook time, this recipe is fantastic for bakers of all skill levels, including kids who want to help in the kitchen!
The Groceries You’ll Need
The magic of this recipe is how it transforms a few simple pantry staples into the most delicious cookies. You likely have everything you need in your kitchen already to whip up a batch right now!
- Peanut Butter – This is the star of the show! For that classic, soft cookie texture, I recommend using a standard creamy peanut butter like Jif or Skippy. Natural peanut butters that separate can sometimes make cookies more dry or crumbly.
- Butter – This adds richness and helps make the cookies wonderfully tender. Make sure your unsalted butter is softened to room temperature so it creams easily with the sugar.
- Sugars – We use a mix of both granulated (white) and light brown sugar. The white sugar helps the edges get nice and crisp, while the brown sugar adds moisture, chewiness, and a hint of molasses flavor.
- Egg – One large egg is all you need to bind the dough together and give the cookies structure. Having it at room temperature helps it mix in more evenly.
- All-Purpose Flour – This gives the cookies their body. Nothing fancy needed here, just regular all-purpose flour will do the trick.
- Vanilla Extract, Baking Soda, and Salt – These are the essential background players! Vanilla adds warmth, baking soda helps the cookies rise and spread just the right amount, and a pinch of salt makes that sweet peanut butter flavor pop.
How to Make These Air Fryer Peanut Butter Cookies
This is where the fun begins! Making the dough is quick and easy, and the air fryer does the rest of the work.
- Mix the Wet Ingredients: In a medium bowl, use an electric mixer or a whisk to cream together the softened butter, granulated sugar, and brown sugar until the mixture is light and fluffy. This usually takes about 2 minutes. Then, beat in the peanut butter until it’s fully combined. Finally, add the egg and vanilla extract and mix until just smooth.
- Combine the Dry Ingredients: In a separate, smaller bowl, whisk together the all-purpose flour, baking soda, and salt. This helps ensure the baking soda is evenly distributed so your cookies rise perfectly.
- Make the Cookie Dough: Gradually add the dry flour mixture to the wet peanut butter mixture. Mix on low speed or by hand with a spatula until everything is just combined. Be careful not to overmix the dough, as that can make the cookies tough.
- Preheat the Air Fryer: Now is the time to get your air fryer ready. Preheat it to 320°F (160°C). This lower temperature is key for baking in the air fryer, as it prevents the tops from browning too quickly before the inside is cooked.
- Shape the Cookies: Scoop out about 1 tablespoon of dough and roll it into a 1-inch (2.5 cm) ball. Place the balls into the preheated air fryer basket, making sure to leave about 2 inches of space between them for spreading. You will need to cook these in 2-3 batches.
- Add the Famous Criss-Cross: Take a fork and gently press down on the top of each cookie ball. Then, rotate the fork 90 degrees and press down again to create that classic criss-cross pattern. This also helps the cookie bake more evenly.
- Time to Air Fry! Place the basket into the air fryer and cook for 5-7 minutes. The cookies are done when the edges look lightly golden and the centers appear set. They might look slightly underdone in the very middle, but they will firm up perfectly as they cool.
- Cool and Enjoy: Carefully remove the cookies from the air fryer (a small spatula helps!) and transfer them to a wire rack to cool completely. Repeat the shaping and cooking steps with the remaining dough.
How to Store, Reheat, and Freeze
One of the best things about this recipe is that you can enjoy the cookies now and save some for later. They store beautifully!
Storage:
To keep your cookies fresh, let them cool completely and then store them in an airtight container at room temperature. They will stay soft and delicious for up to 5 days. There’s no need to refrigerate them; in fact, the fridge can make them dry and hard.
Freezing:
This recipe is fantastic for freezing, so you can have cookie dough ready to go at a moment’s notice!
- To Freeze Baked Cookies: Once the cookies are completely cool, place them in a single layer on a baking sheet and pop them in the freezer for about an hour until they are solid. Then, transfer the frozen cookies to a freezer-safe bag or container. They’ll keep for up to 3 months.
- To Freeze Cookie Dough: Roll the dough into balls and press them with the fork pattern as usual. Place the unbaked cookies on a parchment-lined plate and freeze until solid. Transfer them to a freezer bag. You can bake them straight from frozen! Just add 1-2 extra minutes to the air frying time.
Reheating:
While these cookies are amazing at room temperature, there’s nothing like that “freshly baked” warmth. To reheat, simply place a cookie in the air fryer at 300°F (150°C) for 1-2 minutes. It will be perfectly warm and soft, with the edges crisped up again. I would avoid the microwave, as it can make them tough.
Variations to Try
While the classic recipe is a total winner, it’s also a perfect base for getting creative. Here are a few of my favorite fun twists:
- Peanut Butter Chocolate Chip Cookies: A match made in heaven! Gently fold in about ½ cup (90g) of your favorite chocolate chips (semi-sweet, milk, or dark all work great) after you’ve mixed the dough.
- Flourless Gluten-Free Cookies: For a naturally gluten-free option, you can make the famous 3-ingredient peanut butter cookie! Just mix 1 cup of peanut butter, 1 cup of sugar, and 1 large egg. The texture will be denser and chewier, but they are incredibly delicious and simple. Air fry using the same instructions.
- Chocolate Dipped Cookies: For an elegant touch, wait until the cookies are completely cool. Melt about ½ cup of chocolate wafers or chips in the microwave. Dip one half of each cookie into the melted chocolate, letting any excess drip off. Place them on parchment paper until the chocolate is firm.
- Add a Little Crunch: If you love texture, try folding in ¼ cup (30g) of chopped roasted peanuts or pecans into the dough along with the flour. It adds a delightful crunch to every bite.
What to Serve with These Cookies
A perfect cookie deserves the perfect partner! Here are a few simple ideas to make your cookie experience even better:
- A Tall Glass of Cold Milk: You can’t beat the classic combination. It’s simple, nostalgic, and absolutely perfect.
- A Scoop of Ice Cream: Turn your cookie into a mini dessert masterpiece by serving it alongside a scoop of vanilla bean or chocolate ice cream. You can even make a cookie sandwich!
- Your Favorite Hot Drink: The salty-sweet flavor of a peanut butter cookie pairs wonderfully with a warm cup of coffee or a simple black tea.
- Fresh Fruit: For a lighter, fresher contrast, serve the cookies with a side of sliced bananas or fresh strawberries.
Tips and Tricks for Making this Cookie Recipe Perfect
Follow these simple tips to guarantee you get the best possible air fryer cookies every single time.
- Don’t Crowd the Basket: This is my number one rule for air frying! Leaving plenty of space between the cookies allows the hot air to circulate properly, which is essential for getting those crispy edges and evenly cooked centers.
- Room Temperature is Key: Using softened butter and a room-temperature egg makes a huge difference. These ingredients blend together into a smoother, more uniform dough, which results in a better cookie texture.
- Know Your Air Fryer: Every air fryer model is a little different. The first time you make these, check them at the 5-minute mark. They might need a minute more or less. Once you know the sweet spot for your machine, you’ll get perfect results every time.
- Let Them Rest Before Moving: The cookies will be very soft and fragile right when they finish cooking. Let them sit in the air fryer basket for a minute or two before you try to move them. This gives them a chance to set up so they won’t fall apart.
- Use Parchment Paper (The Right Way): A small piece of air fryer parchment paper (the kind with holes) makes for zero cleanup. Just make sure it’s weighed down by the cookie dough so it doesn’t fly up and touch the heating element.
Frequently Asked Questions

Here are answers to a few common questions I get about making these amazing cookies.
Why the Criss-Cross Pattern?
That classic pattern is more than just for looks! Peanut butter cookie dough is quite dense. Gently pressing the dough down with a fork helps flatten the cookie so it can bake more evenly. Over the years, that criss-cross mark has become the signature look that lets everyone know a delicious peanut butter cookie is waiting for them!
Can I Use Natural Peanut Butter?
You can, but it will change the texture. Natural peanut butters tend to have more oil separation, which can make the cookies drier and more crumbly. For that classic soft, chewy, and tender texture you see in the photos, I highly recommend using a standard processed creamy peanut butter like Jif or Skippy, as the emulsifiers in it create a more stable dough.
Why Did My Cookies Crumble or Spread Excessively?
This usually comes down to one of two things. If your cookies are crumbly, they were likely overbaked. Remember to pull them from the air fryer when the center still looks a tiny bit soft! If they spread too much, your butter may have been too melted instead of just softened, or you may have measured the flour a bit short. Be sure to spoon your flour into the measuring cup and level it off rather than scooping it from the bag.
Do I Need Parchment Paper?
While it’s not absolutely required (most air fryer baskets are non-stick), I strongly recommend it. Using a small piece of air fryer parchment paper (the kind with holes) makes cleanup a breeze and ensures your very soft cookies can be lifted out perfectly without any risk of sticking or breaking.
What if My Air Fryer Doesn’t Have the Exact Temperature Setting?
No problem! Most air fryers are slightly different. If yours doesn’t have a 320°F setting, just use the closest temperature you can. If you have to go slightly higher (like 330°F or 340°F), simply reduce the cooking time by a minute or two and check on them early to prevent them from getting too brown.
Last Bites
And there you have it—the secret to perfect peanut butter cookies in minutes! I truly hope you give this recipe a try the next time a cookie craving hits. There is something so satisfying about making a warm, comforting treat from scratch without a lot of time or effort. The crispy edges and soft, chewy centers are simply irresistible.
Whether you’re making these for an after-school snack for the kids, a simple weeknight dessert, or just for yourself, I know they’ll bring a smile to your face. Happy baking!
PrintThe Easiest Air Fryer Peanut Butter Cookies
- Prep Time: 10
- Cook Time: 7
- Total Time: 17
- Yield: 12 cookies 1x
- Category: Dessert
- Method: Air Fryer
- Cuisine: American
Ingredients
Scale
- ½ cup Creamy Peanut Butter (128g)
- ¼ cup Unsalted Butter (57g), softened to room temperature
- ¼ cup Granulated Sugar (50g)
- ¼ cup Light Brown Sugar (55g), packed
- 1 large Egg, room temperature
- ½ tsp Vanilla Extract
- ¾ cup All-Purpose Flour (90g)
- ½ tsp Baking Soda
- ¼ tsp Salt
Instructions
- Mix: Cream butter and sugars. Mix in peanut butter, egg, and vanilla. In a separate bowl, whisk flour, baking soda, and salt. Combine the wet and dry mixtures until a dough forms.
- Preheat: Preheat the air fryer to 320°F (160°C).
- Shape: Roll dough into 1-inch balls. Place them in the air fryer basket and use a fork to press a criss-cross pattern on top.
- Cook: Air fry for 5-7 minutes, until the edges are golden.
- Cool: Carefully remove the cookies and let them cool on a wire rack before enjoying.
Nutrition
- Serving Size: 3
- Calories: 135 kcal
- Sodium: 105mg
- Fat: 8g
- Carbohydrates: 12g
- Fiber: 1g
- Protein: 3g