The Best Fluffy Pancakes recipe you will fall in love with. Full of tips and tricks to help you make the best pancakes.

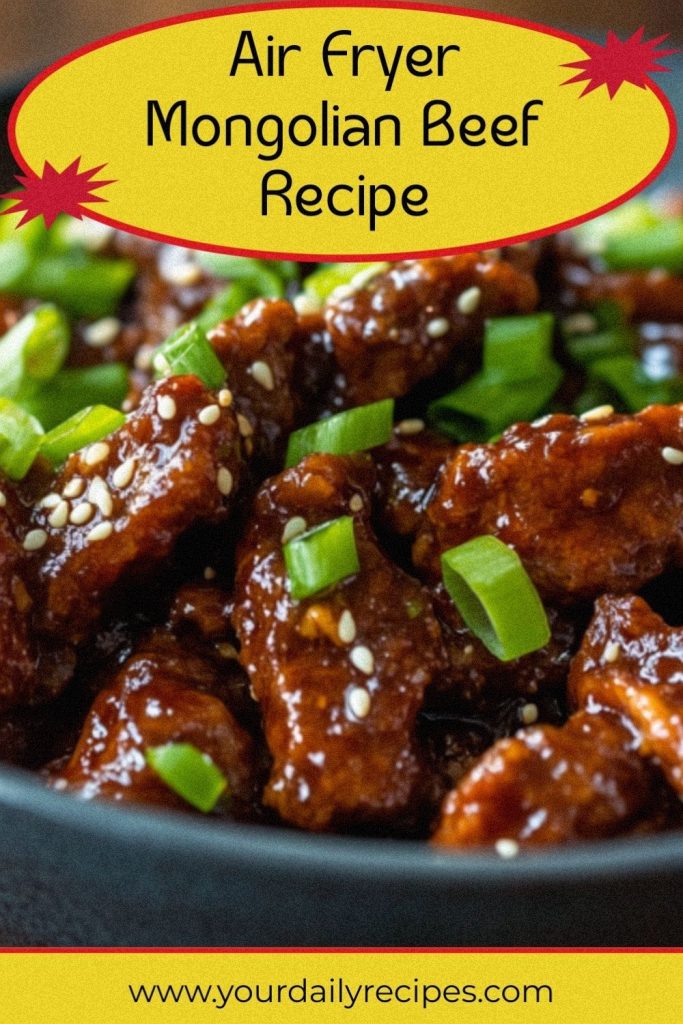
Have you ever craved that delicious, sticky-sweet Mongolian beef from your favorite Chinese restaurant but wished you could make a healthier version at home? Well, you’ve come to the right place! I used to think getting that perfectly crispy-yet-tender beef was impossible without a deep fryer, but my air fryer has completely changed the game. This recipe is my secret to creating restaurant-quality Mongolian beef that’s unbelievably easy and so much better for you.
Imagine biting into tender strips of beef with delightfully crispy edges, all coated in a rich, savory, and slightly sweet garlic ginger sauce. It’s the kind of meal that makes everyone at the dinner table quiet for a minute because it’s just that good. The best part? It comes together in less time than it would take to order delivery.
In this post, I’m going to walk you through every simple step. We’ll talk about the magic ingredients that create the incredible sauce, how to get your beef perfectly cooked in the air fryer, and all my favorite tips to make this dish a guaranteed hit. Get ready to impress your family (and yourself!) with this amazing weeknight meal.
General Information
| Particulars | Details |
|---|---|
| Preparation Time | 15 min. |
| Cook Time | 15 min. |
| Total Time | 30 min. |
| Yields | 4 servings |
| Difficulty | Easy |
| Total Calories | 385 kcal (Per Serving) |
| Cuisine | Chinese-American |
Why You’ll Love This Recipe
This Air Fryer Mongolian Beef has quickly become a favorite in my home, and I’m sure it will in yours, too! It’s one of those recipes that ticks all the boxes: delicious, fast, and easy.
- So Much Healthier: You get that amazing crispy texture you love without deep-frying in tons of oil. The air fryer works its magic with just a tiny bit of spray oil.
- Ready in Under 30 Minutes: This is the perfect meal for those busy weeknights when you need to get something delicious on the table fast.
- Irresistible Sweet & Savory Sauce: The sauce is the star of the show! It’s a perfect blend of soy sauce, brown sugar, garlic, and ginger that’s sticky, glossy, and absolutely addictive.
- Perfectly Tender & Crispy Beef: I’ll show you how a little cornstarch and the air fryer create beef that is incredibly tender on the inside with those crispy, browned edges we all crave.
- Uses Simple Pantry Staples: No need for a special trip to the store. This recipe uses common ingredients you probably already have in your kitchen.
Here’s What You Will Need
The magic of this recipe is how simple, everyday ingredients come together to create something spectacular. You’ll be surprised at how easy it is to whip up that restaurant-style sauce right at home!
For the Crispy Beef:
- Flank Steak: This cut of beef is lean and becomes wonderfully tender when sliced thinly against the grain. Sirloin or skirt steak are also great options.
- Cornstarch: This is the secret ingredient for getting the beef super crispy in the air fryer and it helps thicken the sauce later.
- Avocado Oil or Cooking Spray: Just a little bit helps the beef crisp up without adding a lot of extra fat.
- Salt and Black Pepper: For seasoning the beef perfectly from the start.
For the Mongolian Sauce:
- Low-Sodium Soy Sauce: This is the savory, umami base of our sauce. You can use tamari for a gluten-free option.
- Water or Beef Broth: This helps create the right consistency for the sauce. Beef broth adds an extra layer of rich flavor.
- Brown Sugar: Provides that classic, deep sweetness that balances the salty soy sauce. Coconut sugar or honey can also be used.
- Fresh Garlic and Ginger: These are essential for that amazing aromatic flavor. I highly recommend using fresh, but garlic and ginger paste work in a pinch.
- Sesame Oil: A little bit adds a wonderful nutty, toasty flavor that is key to the dish.
How to Make Air Fryer Mongolian Beef: Step-by-Step Guide
Now for the fun part—putting it all together! This process is surprisingly quick, and you’ll love watching the beef get perfectly crispy in the air fryer.
- Prepare the Steak: If you haven’t already, slice your flank steak very thinly (about 1/4-inch or 6mm thick) against the grain. This is super important for keeping the beef tender! Pat the slices dry with a paper towel. In a medium bowl, toss the beef slices with salt, pepper, and the cornstarch until every piece is lightly coated.
- Preheat Your Air Fryer: Go ahead and preheat your air fryer to 400°F (200°C). This is key to getting a nice, crispy sear on the beef right away.
- Cook the Beef: Lightly spray your air fryer basket with cooking spray or avocado oil. Place the coated beef slices in a single layer in the basket. It’s important not to overcrowd the basket, so you’ll likely need to do this in two batches. Air fry for 6-8 minutes, flipping the pieces halfway through. The beef is done when it’s browned and crispy on the edges. Set the cooked beef aside while you cook the second batch.
- Make the Sauce: While the beef is cooking, you can make the delicious Mongolian sauce. In a small saucepan over medium heat, whisk together the soy sauce, water (or beef broth), brown sugar, minced garlic, and minced ginger. Bring the mixture to a simmer, then reduce the heat and let it gently bubble for 3-4 minutes, until the sauce has thickened slightly. Stir in the toasted sesame oil at the very end.
- Combine and Serve: Once all the beef is cooked and the sauce is ready, it’s time to bring them together. You can either pour the sauce over the beef in a large bowl and toss to coat, or you can add the crispy beef directly into the saucepan with the sauce. Stir gently until every piece is coated in the glossy sauce. Garnish with sliced green onions and sesame seeds, and serve immediately!
How to Store, Reheat, and Freeze
This dish is definitely best when enjoyed fresh, but leftovers are still delicious! Here’s how to handle them properly.
Storage:
- Refrigerator: Store any leftover Mongolian beef in an airtight container in the refrigerator for up to 3-4 days. The beef will lose some of its crispiness as it sits in the sauce, but the flavor will still be fantastic.
Freezing:
- You can freeze the cooked dish, but be aware the texture won’t be as crispy upon reheating. Let the dish cool completely, then place it in a freezer-safe airtight container or zip-top bag. It will keep well in the freezer for up to 3 months. Thaw it overnight in the refrigerator before reheating.
Reheating:
- Best Method (Stovetop): The best way to reheat this dish is in a skillet or pan over medium-low heat. Add a splash of water or beef broth if the sauce is too thick. Heat until the beef is warmed through, stirring occasionally. This helps revive the sauce without making the beef rubbery.
- Air Fryer Method: For a little extra crispiness, you can reheat the beef in the air fryer for 2-3 minutes at 350°F (175°C). Be careful not to overcook it. You can warm the sauce separately and toss it with the beef after.
- What to Avoid: I recommend avoiding the microwave, as it can make the beef tough and chewy.
Variations to Try
One of the best things about this recipe is how easy it is to customize. Once you’ve got the basic method down, feel free to play around with it! Here are a few of my favorite ideas.
- Make it Spicy: If you like a little heat, this dish is amazing with a spicy kick. Try adding 1-2 teaspoons of sriracha or a pinch of red pepper flakes to the sauce while it simmers. Adjust the amount to get the perfect level of spice for you.
- Add Some Veggies: Turn this into a complete one-pan meal by adding vegetables! Broccoli florets, sliced bell peppers (red and green are great), or sliced onions are fantastic additions. You can air fry them for a few minutes before cooking the beef, then toss everything together with the sauce at the end.
- Gluten-Free Mongolian Beef: It’s super easy to make this recipe gluten-free! Simply swap the soy sauce for Tamari or a certified gluten-free soy sauce. Cornstarch is naturally gluten-free, but always double-check the label to be safe.
- Try it with Chicken: This recipe works beautifully with chicken, too! Use boneless, skinless chicken breasts or thighs cut into bite-sized pieces. Follow the same steps for coating and air frying, but make sure the chicken is cooked through to an internal temperature of 165°F (74°C).
What To Serve With This Dish
This Air Fryer Mongolian Beef is so versatile and pairs well with many different sides. You can keep it simple or dress it up for a full-course meal.
- Fluffy White Rice: The classic pairing for a reason! Steamed jasmine or basmati rice is perfect for soaking up every last drop of that incredible sauce.
- Healthy Grains: For a healthier, fiber-rich option, serve it over a bed of quinoa or brown rice.
- Steamed Vegetables: Simple steamed broccoli, bok choy, or green beans add a fresh, crunchy element that cuts through the richness of the sauce.
- Low-Carb Options: To keep things low-carb, this beef is delicious with cauliflower rice or zucchini noodles (zoodles).
Helpful Pro Tips and Tricks
Over the years, I’ve learned a few little secrets that take this dish from great to absolutely perfect. Here are my best tips for success every time!
- Freeze Your Steak for Easy Slicing: For perfectly thin, uniform slices, pop your flank steak in the freezer for about 20-30 minutes before slicing. This firms it up just enough to make cutting against the grain incredibly easy.
- Don’t Crowd the Air Fryer: I can’t stress this enough! Giving the beef pieces their own space is the number one secret to getting them truly crispy. Cooking in batches might take an extra minute, but the results are so worth it.
- Fresh is Best for Flavor: While you can use garlic and ginger paste in a pinch, using freshly minced garlic and ginger will give your sauce a much brighter, more powerful flavor.
- Taste and Adjust the Sauce: Don’t be afraid to taste your sauce as it simmers. If you prefer it sweeter, add a little more brown sugar. If you want it less sweet, add a tiny splash more soy sauce or water. Cooking is all about making it perfect for your taste buds!
- Get the Sauce Ready First: To make the process seamless, I like to have all my sauce ingredients measured and ready to go in the saucepan before I even start air frying the beef. That way, you can simmer the sauce while the last batch of beef is cooking, and everything will be ready at the same time.
Frequently Asked Questions

Here are answers to a few common questions I get about this recipe. If you have any others, feel free to leave them in the comments below!
Why isn’t my beef crispy?
This is a great question, and there are usually two simple reasons for this. First, make sure you don’t overcrowd the air fryer basket. The beef needs space for the hot air to circulate around each piece to get it crispy. Cook in batches if you have to! Second, ensure the beef is lightly but evenly coated in cornstarch. This is what creates that delicious, crispy outer layer.
What does it mean to slice beef “against the grain”?
If you look closely at a cut of beef like flank steak, you’ll see tiny parallel lines running through the meat—these are the muscle fibers. “Slicing against the grain” means you slice perpendicular (at a 90-degree angle) to those lines. This cuts the long, tough muscle fibers into shorter pieces, making the beef incredibly tender and much easier to chew. It’s a small step that makes a huge difference!
Can I use a different cut of beef?
Absolutely! While flank steak is traditional and works perfectly, sirloin steak is another fantastic and affordable option. You could also use skirt steak or even New York strip. The most important thing is to slice whatever cut you choose thinly and against the grain.
Can I make this in the oven instead?
Yes, you can. It won’t get quite as crispy as it does in the air fryer, but it will still be delicious. Preheat your oven to 425°F (220°C). Arrange the cornstarch-coated beef in a single layer on a baking sheet lined with parchment paper and lightly sprayed with oil. Bake for 10-12 minutes, flipping the pieces halfway through, until they are browned and cooked through. Then, toss with the sauce as directed.
Last Bites
And there you have it—a Mongolian beef recipe that’s so good, you’ll want to skip the takeout for good. It’s amazing how a few simple ingredients and an air fryer can create a meal that’s bursting with flavor, has the most incredible texture, and is ready in minutes. It’s a healthy, satisfying dish that brings the whole family to the table.
I truly hope you love this recipe as much as I do. It’s one of those meals that proves that cooking at home can be faster, healthier, and even more delicious than eating out. I can’t wait for you to try it! If you do, please leave a comment below and let me know how it turned out. Happy cooking!
PrintAir Fryer Mongolian Beef: Better Than Takeout!

- Prep Time: 15
- Cook Time: 15
- Total Time: 30
- Yield: 4 Servings 1x
- Category: Main Course
- Method: Air Fryer
- Cuisine: Chinese-American
Ingredients
Scale
- For the Beef:
- 1 lb Flank Steak, thinly sliced against the grain (450g)
- 1/4 cup Cornstarch (32g)
- 1 tbsp Avocado Oil (or other high-heat oil) (15ml)
- 1/2 tsp Kosher Salt
- 1/4 tsp Black Pepper, freshly ground
- For the Sauce & Garnish:
- 1/2 cup Low-Sodium Soy Sauce (or Tamari) (120ml)
- 1/2 cup Water (or low-sodium beef broth) (120ml)
- 1/2 cup Brown Sugar, packed (100g)
- 1 tbsp Fresh Ginger, minced
- 4 cloves Garlic, minced (about 1.5 tbsp)
- 1 tsp Toasted Sesame Oil (5ml)
- 2 Green Onions, sliced for garnish
- 1 tsp Sesame Seeds, for garnish (optional)
Instructions
- Prep & Preheat: Slice steak thinly and toss with cornstarch, salt, and pepper. Preheat the air fryer to 400°F (200°C).
- Air Fry Beef: Cook the beef in a single layer for 6-8 minutes, flipping halfway, until crispy. Work in batches to avoid overcrowding.
- Make Sauce: While the beef cooks, simmer soy sauce, water, brown sugar, garlic, and ginger in a saucepan for 3-4 minutes until slightly thickened. Stir in sesame oil.
- Combine: Toss the crispy air-fried beef with the warm sauce until fully coated.
- Serve: Garnish with sliced green onions and sesame seeds. Serve hot.
Nutrition
- Serving Size: 4
- Calories: 385 kcal
- Sodium: 750mg
- Fat: 15g
- Carbohydrates: 32g
- Fiber: 1g
- Protein: 30g