The Best Fluffy Pancakes recipe you will fall in love with. Full of tips and tricks to help you make the best pancakes.

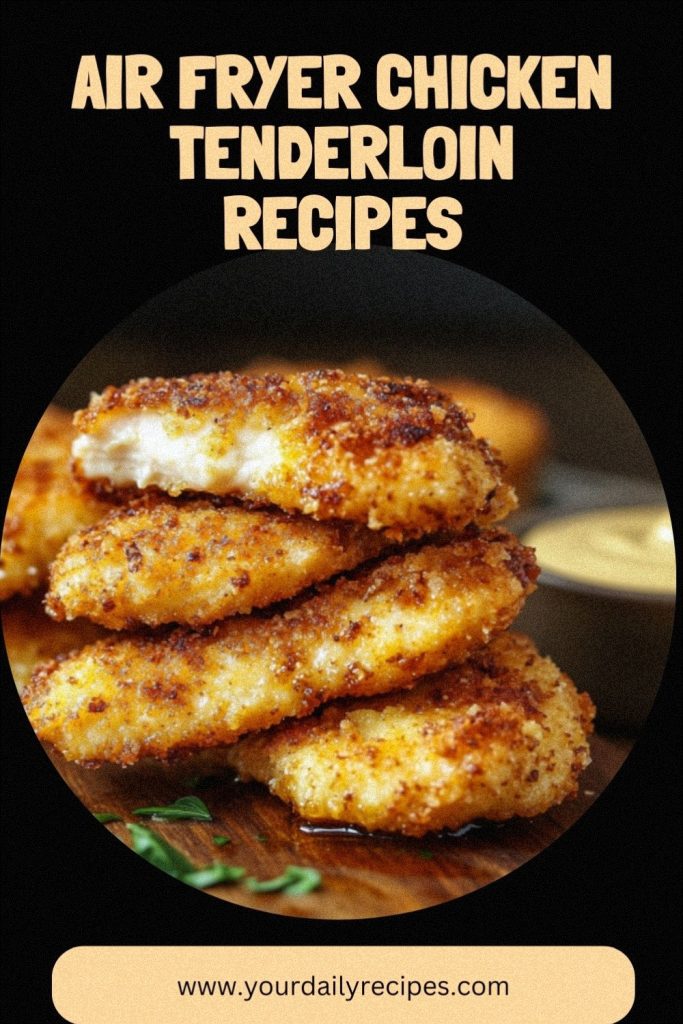
I think we can all agree that there are few things as comforting and delicious as a perfectly cooked chicken tender. That crispy, golden-brown coating that gives way to a super tender, juicy piece of chicken inside? It’s pure magic! For years, I thought the only way to get that amazing crunch was through deep-frying, which always felt like a big, messy project. But then, the air fryer came into my life and changed everything.
These Air Fryer Chicken Tenderloins have become my go-to recipe for a reason. They deliver that restaurant-quality crunch and flavor we all crave, but without all the extra oil and cleanup. They are incredibly easy to make, taste absolutely amazing, and are a much healthier way to enjoy a family favorite. It’s the kind of simple, satisfying meal that makes you feel like a kitchen superstar on a busy weeknight.
In this post, I’m going to walk you through every simple step to create the most succulent, crispy chicken tenderloins you’ve ever had. We’ll cover everything from the simple pantry-staple breading to the perfect cooking time, plus tons of tips to guarantee success every single time. Get ready to make this your new favorite way to cook chicken!
General Information
| Particulars | Details |
|---|---|
| Preparation Time | 10 min. |
| Cook Time | 12 min. |
| Total Time | 22 min. |
| Yields | 4 servings |
| Difficulty | Easy |
| Total Calories | 295 kcal (Per Serving) |
| Cuisine | American |
Why You’ll Love This Recipe
This recipe is a true weeknight hero, and I have a feeling it will quickly become a favorite in your home too. Here’s why it’s so special:
- Perfectly Crispy & Juicy: The air fryer circulates hot air to create an unbelievably crispy, golden crust while locking in all the juices, ensuring every bite is tender and delicious.
- Ready in Under 20 Minutes: This is the ultimate fast food, made fresh! From prep to plate, you can have these tenders ready in a flash, making it perfect for busy schedules.
- Healthier Comfort Food: You get all the satisfying crunch of deep-fried chicken with just a tiny fraction of the oil. It’s a meal you can feel great about serving.
- Made with Simple Pantry Staples: No fancy ingredients needed! You probably have everything you need to make these right now in your kitchen.
- Kid-Approved, Adult-Friendly: A total crowd-pleaser! Kids love them for dipping, and adults appreciate the amazing flavor and texture. It’s a win-win for the whole family.
Here’s what you will need
The magic of this recipe is how it uses everyday ingredients to create something truly special. This simple three-step breading process is the secret to a perfect, crunchy coating that sticks to the chicken.
- Chicken Tenderloins – These are the star of the show! They are naturally lean and tender, making them perfect for the air fryer. If you only have chicken breasts, you can easily slice them into tender-sized strips.
- All-Purpose Flour – This creates the base layer for our breading, giving the egg something to cling to. You can substitute with a 1-to-1 gluten-free flour blend if needed.
- Eggs – The eggs act as the binder, helping that crispy breadcrumb coating stick to the chicken perfectly.
- Panko Breadcrumbs – This is the key to getting that ultra-crispy, crunchy texture. Panko breadcrumbs are lighter and flakier than regular breadcrumbs and get much crispier in the air fryer.
- Seasonings – A simple but flavorful blend of paprika, garlic powder, salt, and black pepper gives the chicken a classic, savory taste that pairs well with any dipping sauce.
- Olive Oil Spray – A quick spritz of cooking spray helps the breadcrumbs turn a beautiful golden-brown and get extra crunchy.
How to Make This Dish: Step-by-Step Guide
Now for the fun part! Creating that perfect crunchy coating is easier than you think. Just follow these simple steps, and you’ll have golden, crispy chicken tenders in no time.
- Preheat Your Air Fryer: First things first, preheat your air fryer to 400°F (200°C). Giving it a few minutes to heat up is a key secret to making the tenders extra crispy right from the start.
- Set Up Your Breading Station: You’ll need three shallow dishes or plates. In the first dish, mix the flour, paprika, garlic powder, salt, and pepper. In the second dish, whisk the two eggs until they are nice and smooth. In the third dish, pour in your panko breadcrumbs. Arranging them in an assembly line makes the process super easy!
- Bread the Chicken: Now, let’s get coating! Take one chicken tenderloin at a time. First, dredge it in the flour mixture, making sure to coat all sides, and gently shake off any excess. Next, dip it into the beaten eggs, letting any extra egg drip off. Finally, press the tender firmly into the panko breadcrumbs, ensuring it’s completely covered. Place the breaded tender on a clean plate and repeat with the rest of the chicken.
- Arrange in the Air Fryer Basket: Lightly spray the inside of your preheated air fryer basket with olive oil spray. Place the breaded chicken tenderloins in a single layer in the basket. It’s very important not to overcrowd the basket; cook in batches if you need to. A little space between each tender allows the hot air to circulate and make them crispy all over. Lightly spray the tops of the chicken tenders with more olive oil spray.
- Cook to Crispy Perfection: Air fry for 10-12 minutes, flipping the tenders over halfway through the cooking time (around the 5-minute mark). The chicken is done when the outside is beautifully golden brown and crispy, and the inside is cooked through. For perfect results, check that the internal temperature reaches 165°F (74°C) with a meat thermometer.
- Serve and Enjoy: Carefully remove the chicken tenders from the air fryer and serve them immediately while they’re hot and crunchy. Pair them with your favorite dipping sauces and enjoy!
How to Store, Reheat and Freeze
One of the best things about this recipe is that the leftovers are just as delicious! The key is to reheat them properly to bring back that amazing crunch.
Storage:
- Refrigerator: Once the chicken tenders have cooled completely, you can store them in an airtight container in the refrigerator for up to 3-4 days.
- Freezer: These tenders freeze beautifully! First, let them cool down. Then, place them in a single layer on a baking sheet and pop them in the freezer for about an hour. Once they are frozen solid, transfer them to a freezer-safe bag or container. They will stay fresh for up to 3 months. This “flash freezing” step prevents them from sticking together.
Reheating:
- For the best results, use your air fryer! This will make them hot and crispy again, just like they were freshly made. Place the leftover tenders in the air fryer and cook at 375°F (190°C) for 3-5 minutes, or until heated through and crispy.
- I would avoid reheating them in the microwave, as it will make the crispy breading soft and soggy.
Variations to Try
While the classic recipe is a total winner, it’s also incredibly easy to customize. Here are a few of my favorite fun and tasty variations:
- Spicy Chicken Tenders: Want to add a little heat? Mix 1/2 teaspoon of cayenne pepper or a pinch of red pepper flakes into your flour mixture for a nice, spicy kick.
- Garlic Parmesan Tenders: For a savory, cheesy twist, add 1/4 cup of grated Parmesan cheese and 1 teaspoon of dried Italian seasoning to your panko breadcrumbs before coating the chicken.
- Gluten-Free Tenders: Making these gluten-free is a breeze! Simply swap the all-purpose flour for a cup-for-cup gluten-free flour blend and use gluten-free panko breadcrumbs. They come out just as crispy and delicious.
- Ranch-Flavored Tenders: If you’re a fan of ranch, you’ll love this! Mix one tablespoon of dry ranch seasoning powder into the flour mixture. It gives the tenders a tangy, herby flavor that is simply irresistible.
What To Serve With This Dish
These versatile chicken tenders pair well with so many different sides! You can dress them up for dinner or keep it casual for a fun lunch. Here are a few ideas to get you started:
- Classic Dipping Sauces: A good sauce is a must! Serve them with classics like honey mustard, BBQ sauce, or creamy ranch dressing. For something different, try a homemade spicy aioli or a sweet chili sauce.
- Favorite Fries: You can’t go wrong with a side of crispy fries. Make some air fryer French fries or sweet potato fries for the perfect pairing.
- Fresh Salads: To keep the meal light and healthy, serve the tenders alongside a simple green salad with a vinaigrette dressing, or chop them up and add them on top of a Caesar salad.
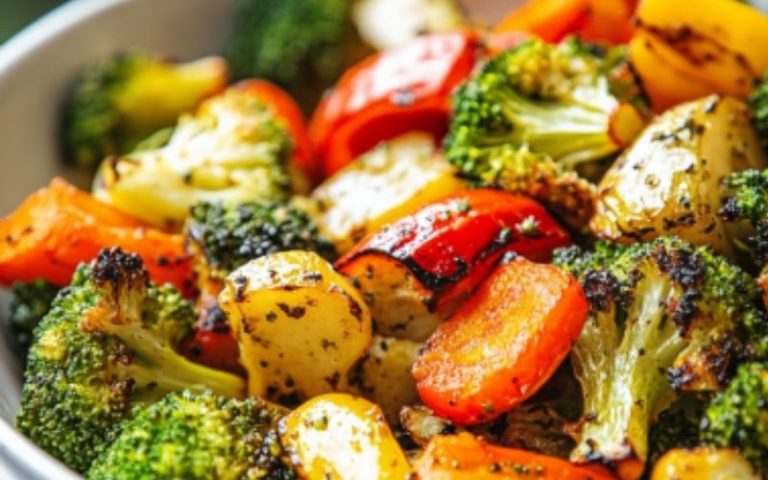
- Comforting Veggies: Roasted broccoli, garlic green beans, or a creamy coleslaw are all fantastic side dishes that round out the meal beautifully.
Helpful Pro Tips and Tricks
To make sure your air fryer chicken tenders come out perfectly every single time, keep these simple tips in mind:
- Don’t Crowd the Basket: This is the most important rule of air frying! Leave a little space between each tenderloin so the hot air can work its magic on all sides. Cook in batches if you have to—it’s worth it for that super crispy finish.
- Pat the Chicken Dry: Before you start breading, take a moment to pat the chicken tenderloins dry with a paper towel. A dry surface helps the flour and the rest of the coating stick much better.
- Press the Panko on Firmly: Don’t be shy when coating the chicken in the panko. Gently press the breadcrumbs onto the chicken to help them adhere and create a thick, crunchy crust that won’t fall off during cooking.
- A Little Spray Goes a Long Way: A light spritz of olive oil or cooking spray on top of the tenders before they go into the air fryer is the secret to getting that beautiful, deep golden-brown color and extra crunch.
- Use a Meat Thermometer: The best way to know for sure if your chicken is cooked perfectly is by using an instant-read thermometer. It takes the guesswork out and ensures your chicken is cooked to a safe 165°F (74°C) without being dry.
Frequently Asked Questions

Here are answers to a few common questions I get about this recipe.
Can I use chicken breasts instead of tenderloins?
Absolutely! If you only have chicken breasts, just slice them lengthwise into 1-inch thick strips to create your own “tenders.” Try to make them as uniform in size as possible so they all cook evenly.
Why aren’t my chicken tenders crispy?
The most common reasons for soggy tenders are overcrowding the basket or not preheating the air fryer. Make sure the air fryer is hot before you put the chicken in and always cook them in a single layer with space in between. Also, don’t forget that light spritz of oil!
Can I make these from frozen chicken?
For the best results, I highly recommend thawing your chicken completely before starting. Breading won’t stick well to frozen chicken, and the cooking time will be much longer and less consistent, which can lead to a rubbery texture.
Last Bites
And there you have it—a simple, quick, and incredibly delicious way to make chicken tenders that your whole family will ask for again and again. This recipe proves that you don’t need a deep fryer to achieve that satisfying crunch we all love. It’s the perfect solution for a last-minute dinner, a healthy lunch, or even a fun appetizer for a party.
I really hope you give these air fryer chicken tenderloins a try. They are a staple in my kitchen, and I’m so excited for them to become one in yours too. Happy cooking!
PrintAir Fryer Chicken Tenderloins

- Prep Time: 10
- Cook Time: 12
- Total Time: 22
- Yield: 4 Servings 1x
- Category: Appetizer
- Method: Air Fryer
- Cuisine: American
Ingredients
Scale
- 1 lb Chicken Tenderloins (about 450g)
- 1/2 cup All-Purpose Flour (60g)
- 2 large Eggs, beaten
- 1 1/2 cups Panko Breadcrumbs (90g)
- 1 tsp Paprika
- 1 tsp Garlic Powder
- 1/2 tsp Kosher Salt
- 1/4 tsp Black Pepper, freshly ground
- Olive Oil Cooking Spray
Instructions
- Preheat: Preheat the air fryer to 400°F (200°C).
- Prep Station: Set up three shallow dishes: one with flour and seasonings, one with beaten eggs, and one with panko breadcrumbs.
- Bread Chicken: Coat each chicken tender first in the flour mixture, then the egg, and finally press it into the panko breadcrumbs.
- Cook: Place the tenders in a single layer in the air fryer basket and lightly spray with oil. Cook for 10-12 minutes, flipping halfway through.
- Serve: Remove when the chicken is golden brown, crispy, and cooked to an internal temperature of 165°F (74°C). Serve immediately.
Nutrition
- Serving Size: 4
- Calories: 295 kcal
- Sodium: 480mg
- Fat: 9g
- Carbohydrates: 20g
- Fiber: 1g
- Protein: 32g